Staff Management
Add team members, configure their availability, and assign services they can provide
Staff Overview
Staff members are the backbone of your booking system. Each staff member has their own profile, weekly availability schedule, break times, vacation management, and service assignments. When a customer books an appointment, the system automatically checks staff availability to show only valid time slots.
What You Can Configure Per Staff Member
Staff List View
The staff list gives you a quick at-a-glance view of all your team members. Each row displays the staff member's name, email, phone number, assigned services count, a mini availability calendar showing which days they work (M T W T F S S), and their department.
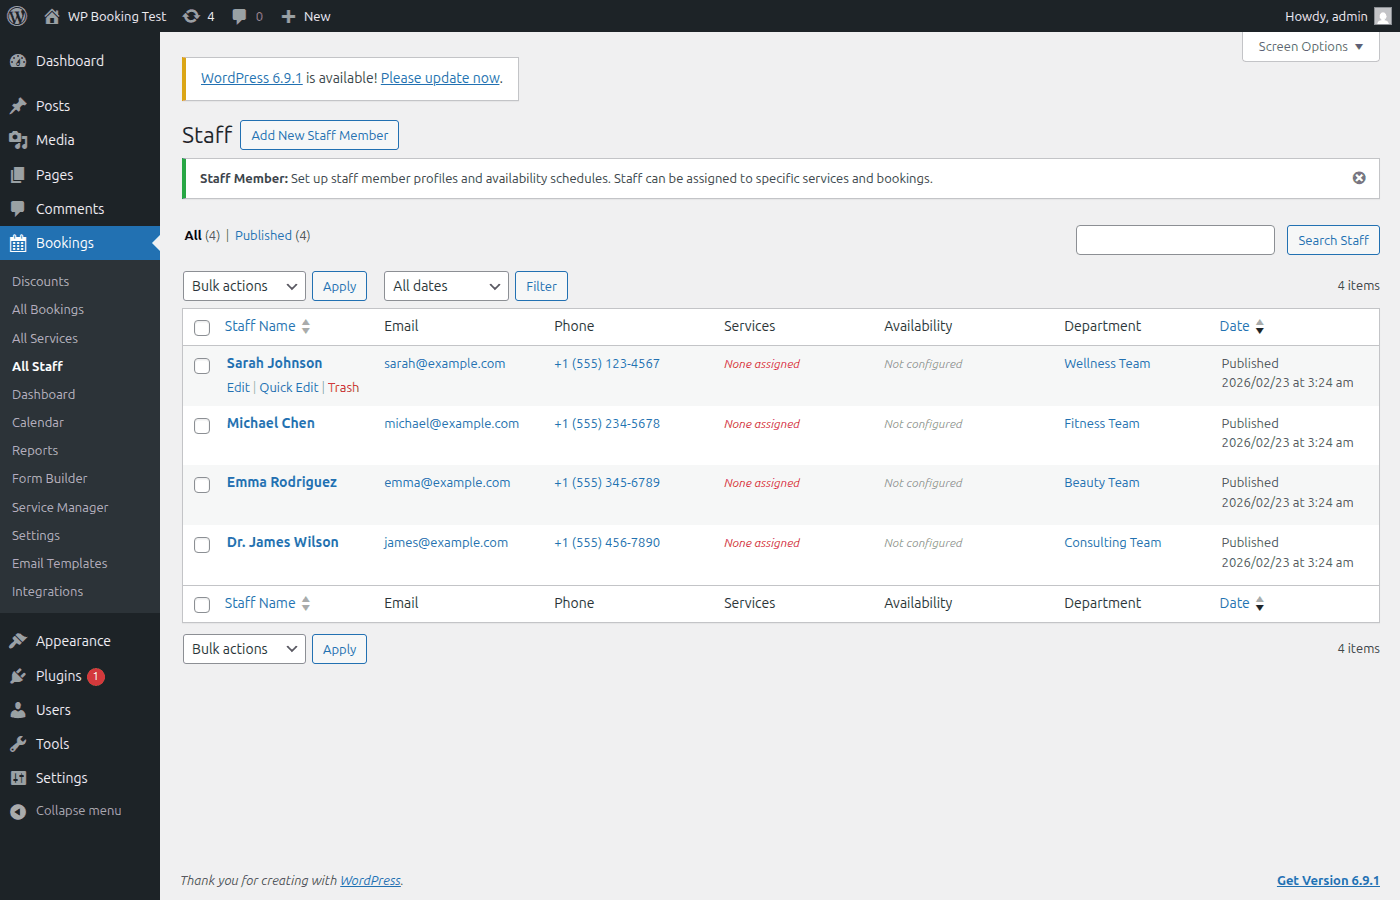
Staff List Columns Explained
| Column | Description |
|---|---|
| Name | The staff member's display name (post title). Click to edit. |
| Contact email address used for booking notifications. | |
| Phone | Phone number for direct contact. |
| Services | Number of services assigned to this staff member. Shows assigned services with a primary service indicator. |
| Availability (M T W T F S S) | Mini weekly calendar. Green indicators for available days, gray for unavailable days. |
| Department | The staff department taxonomy. Useful for organizing large teams. |
Adding a New Staff Member
Follow these steps to add a new staff member to your booking system. You will need to provide their contact information, set their working hours, and assign which services they can provide.
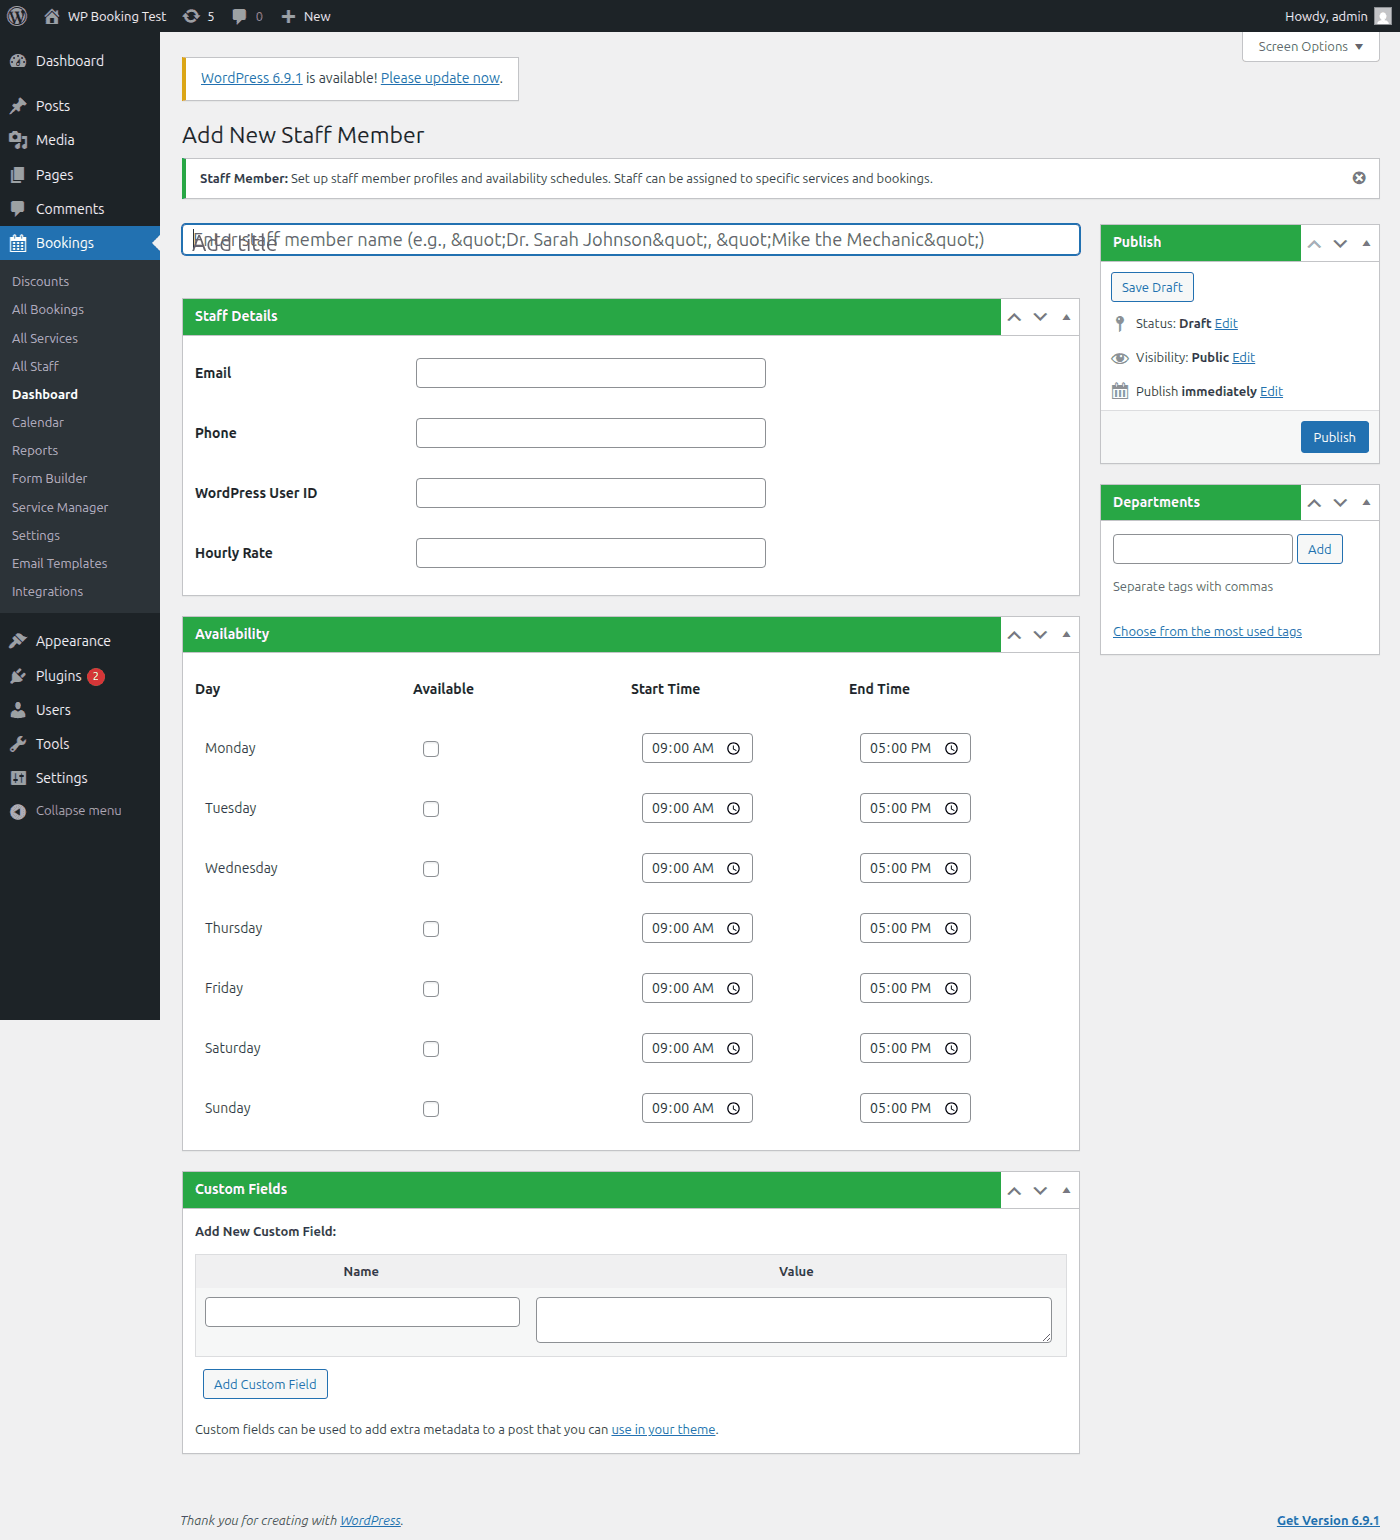
Navigate to Staff → Add New
In your WordPress admin dashboard, go to WP Booking System → Staff → Add New. This opens a blank staff editor screen.
Enter the Staff Name
Type the staff member's full name in the title field at the top of the page. This is the name that will appear to customers during the booking process and in all admin listings.
Fill in Contact Details
In the Staff Details meta box, complete the following fields:
The staff member's email address. Used for sending booking confirmation notifications and reminders.
Contact phone number. Useful for internal reference and can be displayed on the booking form if configured.
Link this staff member to an existing WordPress user account. This enables them to log in and manage their own bookings and schedule from the front-end dashboard.
Enter the staff member's hourly rate (e.g., 45.00). This is used for internal cost tracking and analytics reports. Supports decimal values with two decimal places.
Assign a Department (Optional)
In the Department panel on the right sidebar, assign this staff member to a department. Departments are a WordPress taxonomy, so you can create new ones or select existing ones directly from the editor.
Examples of departments: Hair Stylists, Massage Therapists, Doctors, Trainers.
Click “Publish”
Click the Publish button to save the new staff member. You can continue editing availability and services after publishing.
Pro Tip
If you link a WordPress User ID, the staff member can log into the Customer Dashboard and view their upcoming bookings, update their own availability, and mark bookings as completed. Create a dedicated WordPress user account with the “Booking Staff” role for best results.
Configuring Weekly Availability
Each staff member has a weekly availability schedule that defines which days and hours they are available for bookings. The schedule repeats every week automatically. For one-off changes, use Special Hours / Exceptions instead.
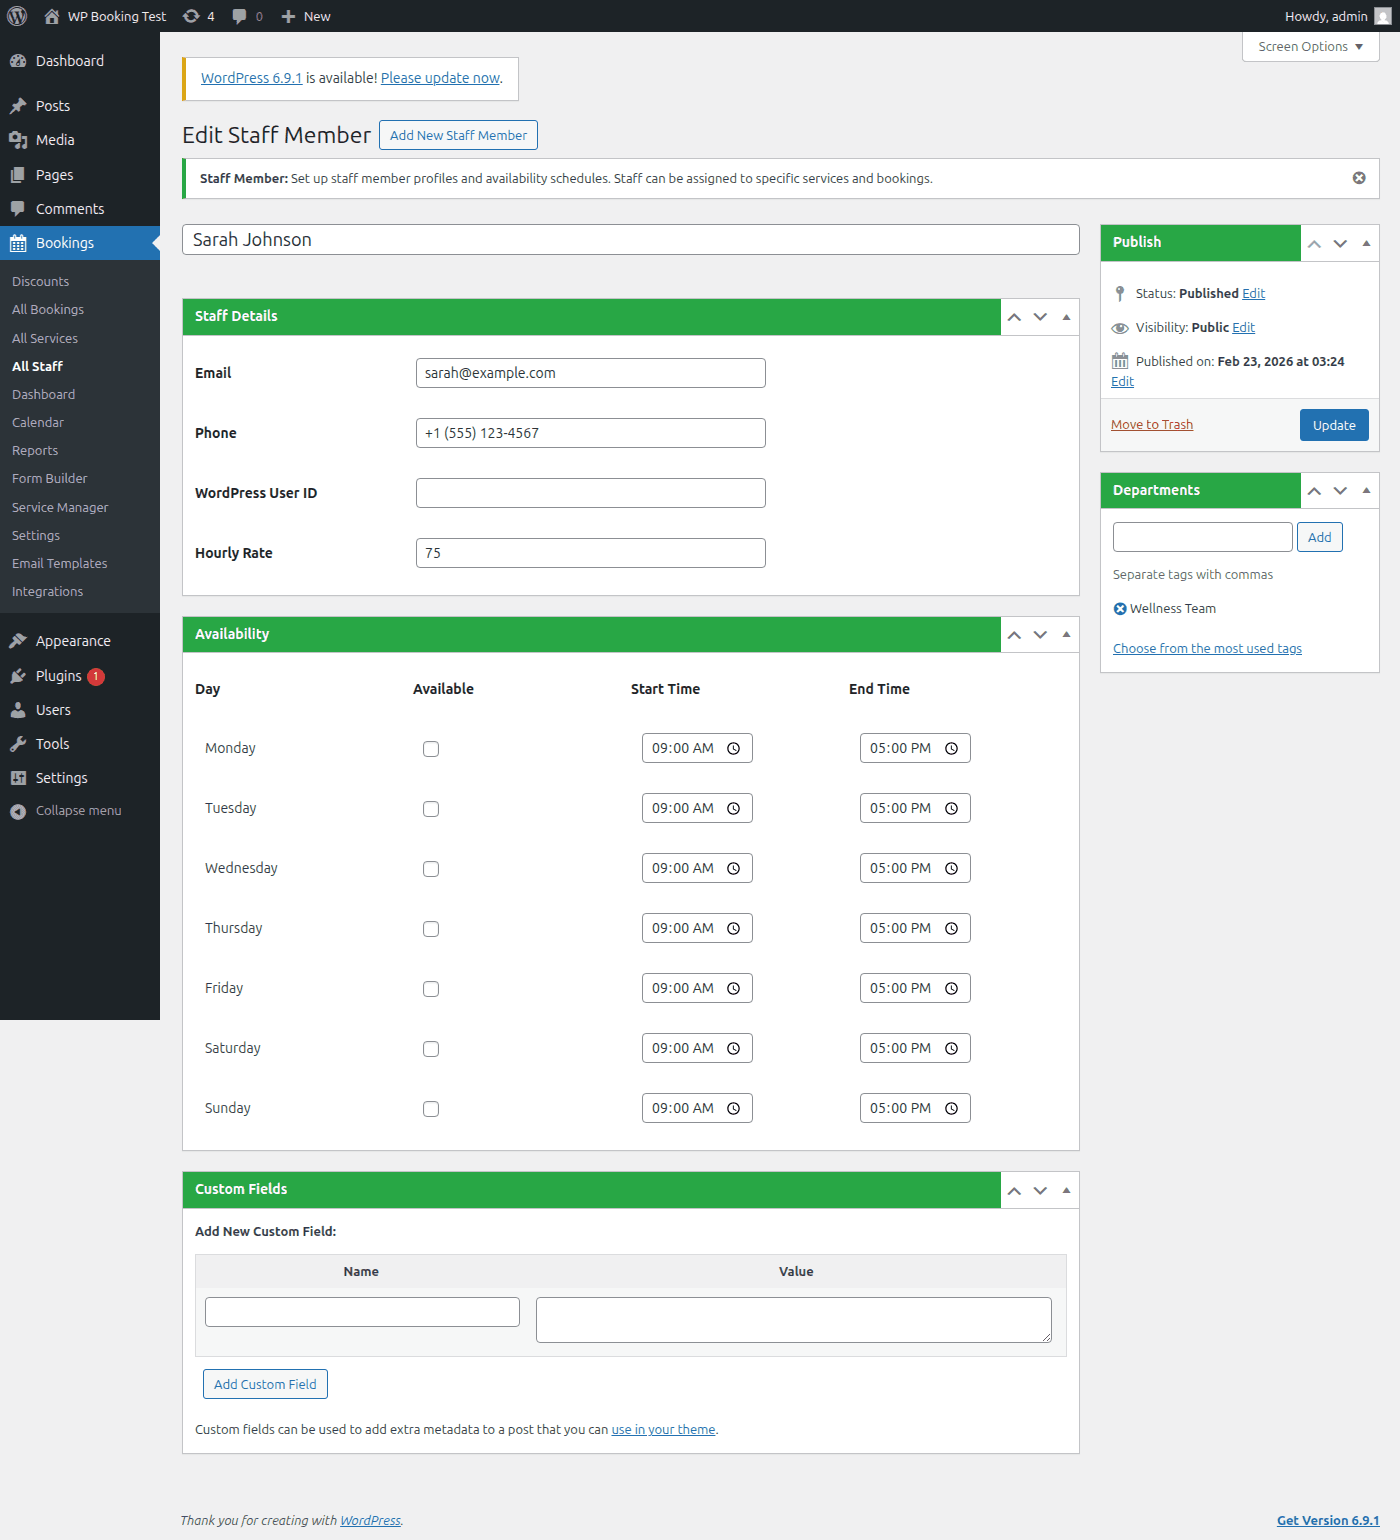
How the Weekly Schedule Works
The Staff Availability Calendar meta box shows seven rows — one for each day of the week (Monday through Sunday). Each row has three controls:
Toggle whether the staff member works on this day. When unchecked, the day is grayed out and customers cannot book on it.
The earliest time customers can book. Selectable in 15-minute intervals from 12:00 AM to 11:45 PM.
The latest time a booking can end. The last available slot will end at or before this time.
Step-by-Step: Setting Up a Weekly Schedule
- Open the staff member for editing by clicking their name in the staff list.
- Scroll down to the Staff Availability Calendar meta box.
- For each working day, check the Available checkbox.
- Set the Start Time (e.g., 9:00 AM) and End Time (e.g., 5:00 PM) for each day.
- Leave non-working days unchecked (e.g., Saturday and Sunday for a weekday-only schedule).
- Click Update to save the schedule.
Quick Action Buttons
Above the weekly schedule, three shortcut buttons help you configure the schedule faster:
Copies Monday's available status, start time, and end time to all other days. Useful when the staff member has the same hours every day.
Enables Monday through Friday and disables Saturday and Sunday. The most common configuration for business-hours staff.
Unchecks all days, making the staff member unavailable on every day. Use this to start fresh before configuring a custom schedule.
Default Schedule
When you create a new staff member, the system applies a default schedule of Monday–Friday, 9:00 AM to 5:00 PM, with Saturday and Sunday disabled. You can customize this immediately after publishing the staff member.
Configuring Break Times
Break times block out periods within a staff member's working hours when they are not available for bookings. This is essential for lunch breaks, rest periods, or recurring meetings.
Adding a Break
- Open the staff member for editing.
- Scroll to the Break Times meta box below the availability calendar.
- Select the Day of the week for the break (Monday–Sunday).
- Enter a Name for the break (e.g., “Lunch Break”).
- Set the Start time (e.g., 12:00 PM).
- Set the End time (e.g., 1:00 PM).
- Click Add Break.
The break is saved immediately via AJAX — no need to click Update separately. You can add multiple breaks per day if needed.
Tip: Multiple Breaks Per Day
You can add as many breaks as you need per day. For example, add a “Morning Tea” break from 10:30–10:45 AM and a “Lunch” break from 12:00–1:00 PM on the same day. The system will exclude all break periods when generating available time slots.
Warning: Break Time Validation
The break end time must be later than the break start time. The system will reject any break where the end time is equal to or before the start time. Also ensure that break times fall within the staff member's working hours for that day.
Managing Time Off & Vacations
Block out date ranges when a staff member is completely unavailable. This overrides their regular weekly schedule for the specified dates.
Adding Time Off
- Open the staff member for editing.
- Scroll to the Time Off / Vacations meta box.
- Select the Type from the dropdown: Vacation, Sick Leave, Personal Day, Training, Holiday, or Other.
- Set the Start Date using the date picker.
- Set the End Date (can be the same as start date for a single day off).
- Optionally add a Reason for internal notes.
- Click Add Time Off.
Time Off Types
- • Vacation — Annual leave, planned holidays
- • Sick Leave — Illness-related absence
- • Personal Day — Personal appointments
- • Training — Professional development
- • Holiday — Public or office holidays
- • Other — Any other absence type
Booking Conflict Detection
When you add time off, the system automatically checks for existing bookings during that date range. If conflicts are found, you will be warned before the time off is saved. You must reschedule or cancel conflicting bookings separately.
Special Hours & Exceptions
Exceptions let you override the regular weekly schedule for a specific date. Use this for one-off changes such as early closings, extended hours, or working on a day that is normally off.
Adding an Exception
- Open the staff member for editing.
- Locate the Special Hours / Exceptions meta box in the right sidebar.
- Select the specific Date you want to override.
- Check or uncheck the Available checkbox:
- Checked: Set custom start and end times for that date.
- Unchecked: The staff member will be marked as “Closed” for that date.
- If available, set the Start and End times.
- Optionally add a Reason (e.g., “Early close for team event”).
- Click Add Exception.
Exception Priority
Exceptions take the highest priority when calculating availability. The system checks in this order: (1) Vacation / Time Off, (2) Special Hours Exception, (3) Regular Weekly Schedule. If a date has both a vacation and an exception, the vacation takes precedence and the staff member will be unavailable.
Assigning Services to Staff
Service assignments control which services a staff member can provide. When a customer selects a service during booking, only staff members assigned to that service will appear as available options.
How to Assign Services
- Open the staff member for editing.
- Locate the Service Assignments meta box in the right sidebar.
- You will see a checklist of all published services. Each service shows its name, duration, and price.
- Check the box next to each service this staff member can provide.
- For each assigned service, select the Primary radio button if this is the staff member's main service. Only one service can be marked as primary.
- Click Update to save the assignments.
Primary Service
The primary service is used as the default when auto-assigning staff. If a customer does not choose a specific staff member, the system prefers staff whose primary service matches the booking.
No Assignments?
If no staff members are assigned to a service, the system falls back to showing all published staff members as available for that service.
Custom Pricing & Duration Per Staff
Each service assignment supports optional custom pricing and duration overrides. This means the same service can have a different price or duration depending on which staff member provides it.
Example: A “Massage” service might be $80 for 60 minutes with a junior therapist, but $120 for 60 minutes with a senior therapist. Set the base price on the service, then override it per staff member in the assignment settings.
Managing Staff Departments
Departments are a WordPress taxonomy attached to the staff post type. They let you organize staff into logical groups for filtering, reporting, and display purposes.
Creating and Assigning Departments
- Navigate to WP Booking System → Staff → Departments to manage department terms.
- Enter a Name for the department (e.g., “Massage Therapists”).
- Optionally set a Slug (auto-generated from the name if left blank).
- Click Add New Department.
- When editing a staff member, assign them to one or more departments from the sidebar panel.
Tip: Department Column Filtering
In the staff list, the Department column is clickable. Click a department name to filter the list and show only staff members in that department. This is especially useful when managing teams of 10 or more staff members.
Linking Staff to WordPress User Accounts
Each staff member can be linked to a WordPress user account via the WordPress User ID field. This enables several self-service features.
Benefits of User Account Linking
How to Find a WordPress User ID
- Go to Users → All Users in the WordPress admin.
- Hover over the user you want to link.
- Look at the URL in the browser status bar — it will contain
user_id=XX. - Enter that number in the WordPress User ID field on the staff edit screen.
Hourly Rate & Cost Tracking
The Hourly Rate field stores the staff member's cost per hour. This value is used in the Analytics dashboard to calculate staff costs, profit margins, and utilization rates.
Setting the Hourly Rate
- Open the staff member for editing.
- In the Staff Details meta box, locate the Hourly Rate field.
- Enter the rate as a decimal number (e.g.,
45.00). Minimum value is 0, and the field supports two decimal places. - Click Update to save.
The hourly rate is for internal tracking only and is never shown to customers on the booking form.
Google Calendar Integration
When Google Calendar sync is enabled and a staff member is connected, the availability engine automatically checks Google Calendar busy times before showing available slots to customers. This prevents double-booking across your booking system and the staff member's personal or work calendar.
How It Works
Google Calendar busy times are cached for 5 minutes to ensure fast page loads. If the Google Calendar API is temporarily unavailable, the system will fall back to showing slots based on the regular schedule without blocking bookings. See the Integrations documentation for setup instructions.
How Availability Is Calculated
Understanding the priority order of availability rules helps you debug scheduling issues and set up complex configurations correctly.
Availability Check Order
When a customer requests a time slot, the system runs through these checks in order. If any check fails, the slot is marked as unavailable:
Is this day of the week checked as available with valid start/end times?
Does this specific date have an exception? If yes, use exception hours (or mark as closed).
Is the staff member on vacation or time off for this date?
Does the requested time slot overlap with any configured breaks?
Does the time slot conflict with an existing confirmed booking (including buffer time)?
Does the slot overlap with a busy period on the staff member's connected Google Calendar?
Is the slot in the past? Time slots that have already passed are automatically excluded.
Best Practices
Always Assign Services Before Going Live
Make sure every staff member has at least one service assigned. If no staff is assigned to a service, the system falls back to all staff, which may produce unexpected results for customers.
Add Buffer Time Between Appointments
Configure buffer time on the service level to prevent back-to-back bookings. The availability engine respects buffer time when calculating open slots, giving staff time to prepare between appointments.
Use Departments for Large Teams
If you have more than 5–10 staff members, departments make management much easier. You can filter the staff list by department and quickly locate specific team members.
Schedule Vacations in Advance
Add planned time off as early as possible. The booking conflict detection feature helps you identify and handle overlaps before they become a problem for customers.
Link Staff to WordPress Users
Linking staff to WordPress accounts enables self-service features and reduces the administrative burden on you. Staff can view their own schedules without needing full WordPress admin access.
Staff Management Complete!
Your staff members are now configured with availability schedules, service assignments, and contact details. The booking form will automatically use this data to show customers only valid time slots.
Next: Managing Bookings